As part of a recent digital housekeeping effort, I decided to audit my backup strategy. This process was an opportunity to develop a more robust approach and to expand my knowledge and expertise. What started as an improvement to my backup strategy, grew in scope and became a fun homelab experiment. This post details that journey.
If you are interested in the Ansible roles and playbooks, check out the repo which includes pretty documentation on usage and customisation.
So let me start with some background. For the last 10 years, I had a patchwork of different backup approaches:
- A Synology DS216 Play NAS with two hard drive RAID array using Synology Hybrid RAID.
- My most important documents synced to icloud drive and ocasionally I’d make snapshots of the folder –it wasn’t big— as a tarball and save a copy on the NAS.
Replacing an aging Synology NAS
The Synology NAS is practically a little Linux with SSH access. It has served me well, thanks to its user friendly web interface and built-in package manager. I installed Plex and could access my media library —which I’ve collected and built over the years— via the browser and the Plex app on an Amazon Fire TV.
However, throughput was often subpar, largely because SMB encryption maxed out the CPU during file transfers; disabling it significantly improved performance. Moreover, I wanted to deploy containers, which wasn’t possible on its older CPU architecture and with its limited resources. The decision to upgrade was solidified when I started getting SMART warnings about the health of one of the hard drives.

What’s a homelab
For the uninitiated, homelab just means a computer that’s running 24/7, typically without a screen, with the purpose of providing services, hence the name server, which can include backups, NAS, media server, etc. It’s like a self-hosted cloud.
Homelabs are not a new idea and there are many thriving communities and resources, e.g. /r/homelab and Perfect Media Server.
My journey into homelabs started in the early 2000s when I ran a server at home that would primarily serve as a static file server and web based mail server, back when USB sticks were rare and prohibitively expensive, Gmail didn’t exist, and the ISP would limit your mailbox to 5MB.
Back then, I ran a Linux distribution called SME Server which came with a Web UI through which you could configure the different services. The initial purpose of the server was to provide my family with a webmail client that could be accessed from anywhere. Since the ISP only supported POP3, the server would download the emails and provide access to the mailboxes with IMAP and Horde. I learned the Linux terminal and many admin skills that have served me well over the years.
Unlike 20 years ago, there’s a massive industry of cloud services with competitive pricing and generous free tiers. So why bother running hardware after all? For me this can be boiled down to three motivations:
- Agency: Control over my own digital experience.
- Resilience: The ability to withstand outages and service disruptions from cloud providers.
- Self-reliance: The satisfaction of meeting my own digital needs while learning and deepening my expertise.
Hardware for a homelab
My criteria for picking hardware were:
- Size: I needed something small
- Extensibility: I wanted the ability to add RAM, and replace SSDs in case of failure
- Price: I didn’t want to spend too much
- Power: I actually didn’t care too much about power consumption, since I’m only running a single server.
In recent years, the market has been flooded with Chinese brands such as Beelink who produce excellent Mini PCs, though they aren’t very extensible. In the lower price ranges (~150 USD), many come with the Intel N150, which while very power efficient, wasn’t as performant as slightly older mini PCs at the same price.
I eventually opted for the HP EliteDesk 800 G4 Mini, which I purchased refurbished for 150 Euros with a 2-year warranty. It comes with the Intel 8th gen Core i5-8500 from 2018 and scores almost double the performance of the Intel N150, albeit at up to 10 times the power consumption (see comparison).
The main reason for my choice, however, was its hardware extensibility: two memory slots and two internal NVMe M.2 slots. It also sports Intel vPro with Active Management Technology (AMT) which allows for headless remote control without physical keyboard/screen access. This meant I could install Ubuntu Server and control the BIOS remotely, using the open source MeshCommander.
One thing I learned while setting it up is that for remote control to work without a physical screen, I needed a dummy DisplayPort emulator. This tiny little plug that looks like a flash drive and helps prevent issues like a blank screen when trying to connect to a computer remotely.
I ended up also extending the memory to 16GB of DDR4 RAM, and adding an second 1TB WD BLACK SN770 NVMe SSD. For more durable and redundant storage I got two Seagate IronWolf 6TB HDs. After extensive research, I came to the conclusion that the best way to attach these disks is using a USB 3.2 Gen2 DAS which supports up to 10Gpbs. There aren’t many such DAS on the market, but the TERRAMASTER D4-320 is one of those and sports 4 bays, in case I want to add more disks in the future. The main benefit this DAS offers is a way to externally connect more drives, also referred to as JBOD (Just a Bunch of Disks), that appear to the operating system as separate disks:
Disk /dev/sda: 5.46 TiB, 6001175126016 bytes, 11721045168 sectors
Disk model: TDAS
Units: sectors of 1 * 512 = 512 bytes
Sector size (logical/physical): 512 bytes / 4096 bytes
I/O size (minimum/optimal): 4096 bytes / 4096 bytes
Disklabel type: gpt
Disk identifier: FA7FD1EB-E867-B349-864E-8C0FE22A1312

Device           Start         End     Sectors  Size Type
/dev/sda1         2048 11721027583 11721025536  5.5T Solaris /usr & Apple ZFS
/dev/sda9  11721027584 11721043967       16384    8M Solaris reserved 1


Disk /dev/sdb: 5.46 TiB, 6001175126016 bytes, 11721045168 sectors
Disk model: TDAS
Units: sectors of 1 * 512 = 512 bytes
Sector size (logical/physical): 512 bytes / 4096 bytes
I/O size (minimum/optimal): 4096 bytes / 4096 bytes
Disklabel type: gpt
Disk identifier: DCB45D5F-1999-214F-B27F-08706E7066B8

Device           Start         End     Sectors  Size Type
/dev/sdb1         2048 11721027583 11721025536  5.5T Solaris /usr & Apple ZFS
/dev/sdb9  11721027584 11721043967       16384    8M Solaris reserved 1
Note that it was important for me to avoid hardware RAID at all costs, because it creates a dependency on the specific hardware to manage the RAID which poses data loss risk if the hardware malfunctions and you cannot find an identical replacement. With the zfs filesystem, I set up a software RAID array using the two disks, and know that if I change the hardware, I can just import the the storage pool.
When setting up the ZFS pool, I set up two disk mirror vdev (similar to RAID1) rather than a more complex RAIDZ array with parity vdevs (like RAID5). For more information see zfs > Why Mirror VDEVs Over RAIDZ.
Reproducibility with Ansible
Snowflake servers are servers that have been manually configured such that they are difficult if not impossible to reproduce. This is typically a problem if you want to replace the hardware and reproduce the exact same setup.
After setting up, deploying, and operating many servers over the years in both professional and personal capacity, I’ve learned that so called snowflake servers are bad, or as Martin Fowler once put it:
The result is a unique snowflake - good for a ski resort, bad for a data center.
When setting up the homelab server, I avoided this by using a server configuration management tool called Ansible.
Ansible is a modern configuration management tool that facilitates the task of setting up and maintaining remote servers, with a minimalist design intended to get users up and running quickly.
With Ansible, you write Roles comprised of individual tasks which are called from a Playbook. By rough analogy, a Role is like a class where a Playbook is an object. Each role can be responsible for a specific goal, e.g. installing Prometheus, setting up a ZFS storage pool, or deploying a container. It also comes with a templating system which can be used for templating configuration files and service definitions. This is especially useful for making Roles reusable and shareable.
Where Ansible stands out as a configurate management software, is that it doesn’t require any special daemon or agent installed on the target machine. You only need SSH access and for Python to be installed. Ansible is designed with idempotence in mind; as such you can run the same playbook or task multiple times knowing subsequent runs won’t make any changes if the system is already in the desired state. So you can safely re-run playbooks without worrying about breaking things.
What I like the most about Ansible is how easy it is to get up and running without a huge investment in learning every aspect of it. Another thing I like about Ansible is that it serves as a form of documentation for the intended end-state of a server, which is especially useful when learning and mastering new tools or packages. For example, in the ZFS role I created to create the mirror storage pool, I documented many ZFS properties, e.g. hash function, in great length in the default variables file thereby enhancing reusability for other use cases.
Most of what I’m running on the server is Docker containers, which makes it really easy to manage with the community.docker.docker_container. In essence, my roles for Docker containers encapsulate the docker image, along with port mappings, network configuration, volume mounts, with a lot of the configuration interpolated from variables, ensuring flexibility and reusability.
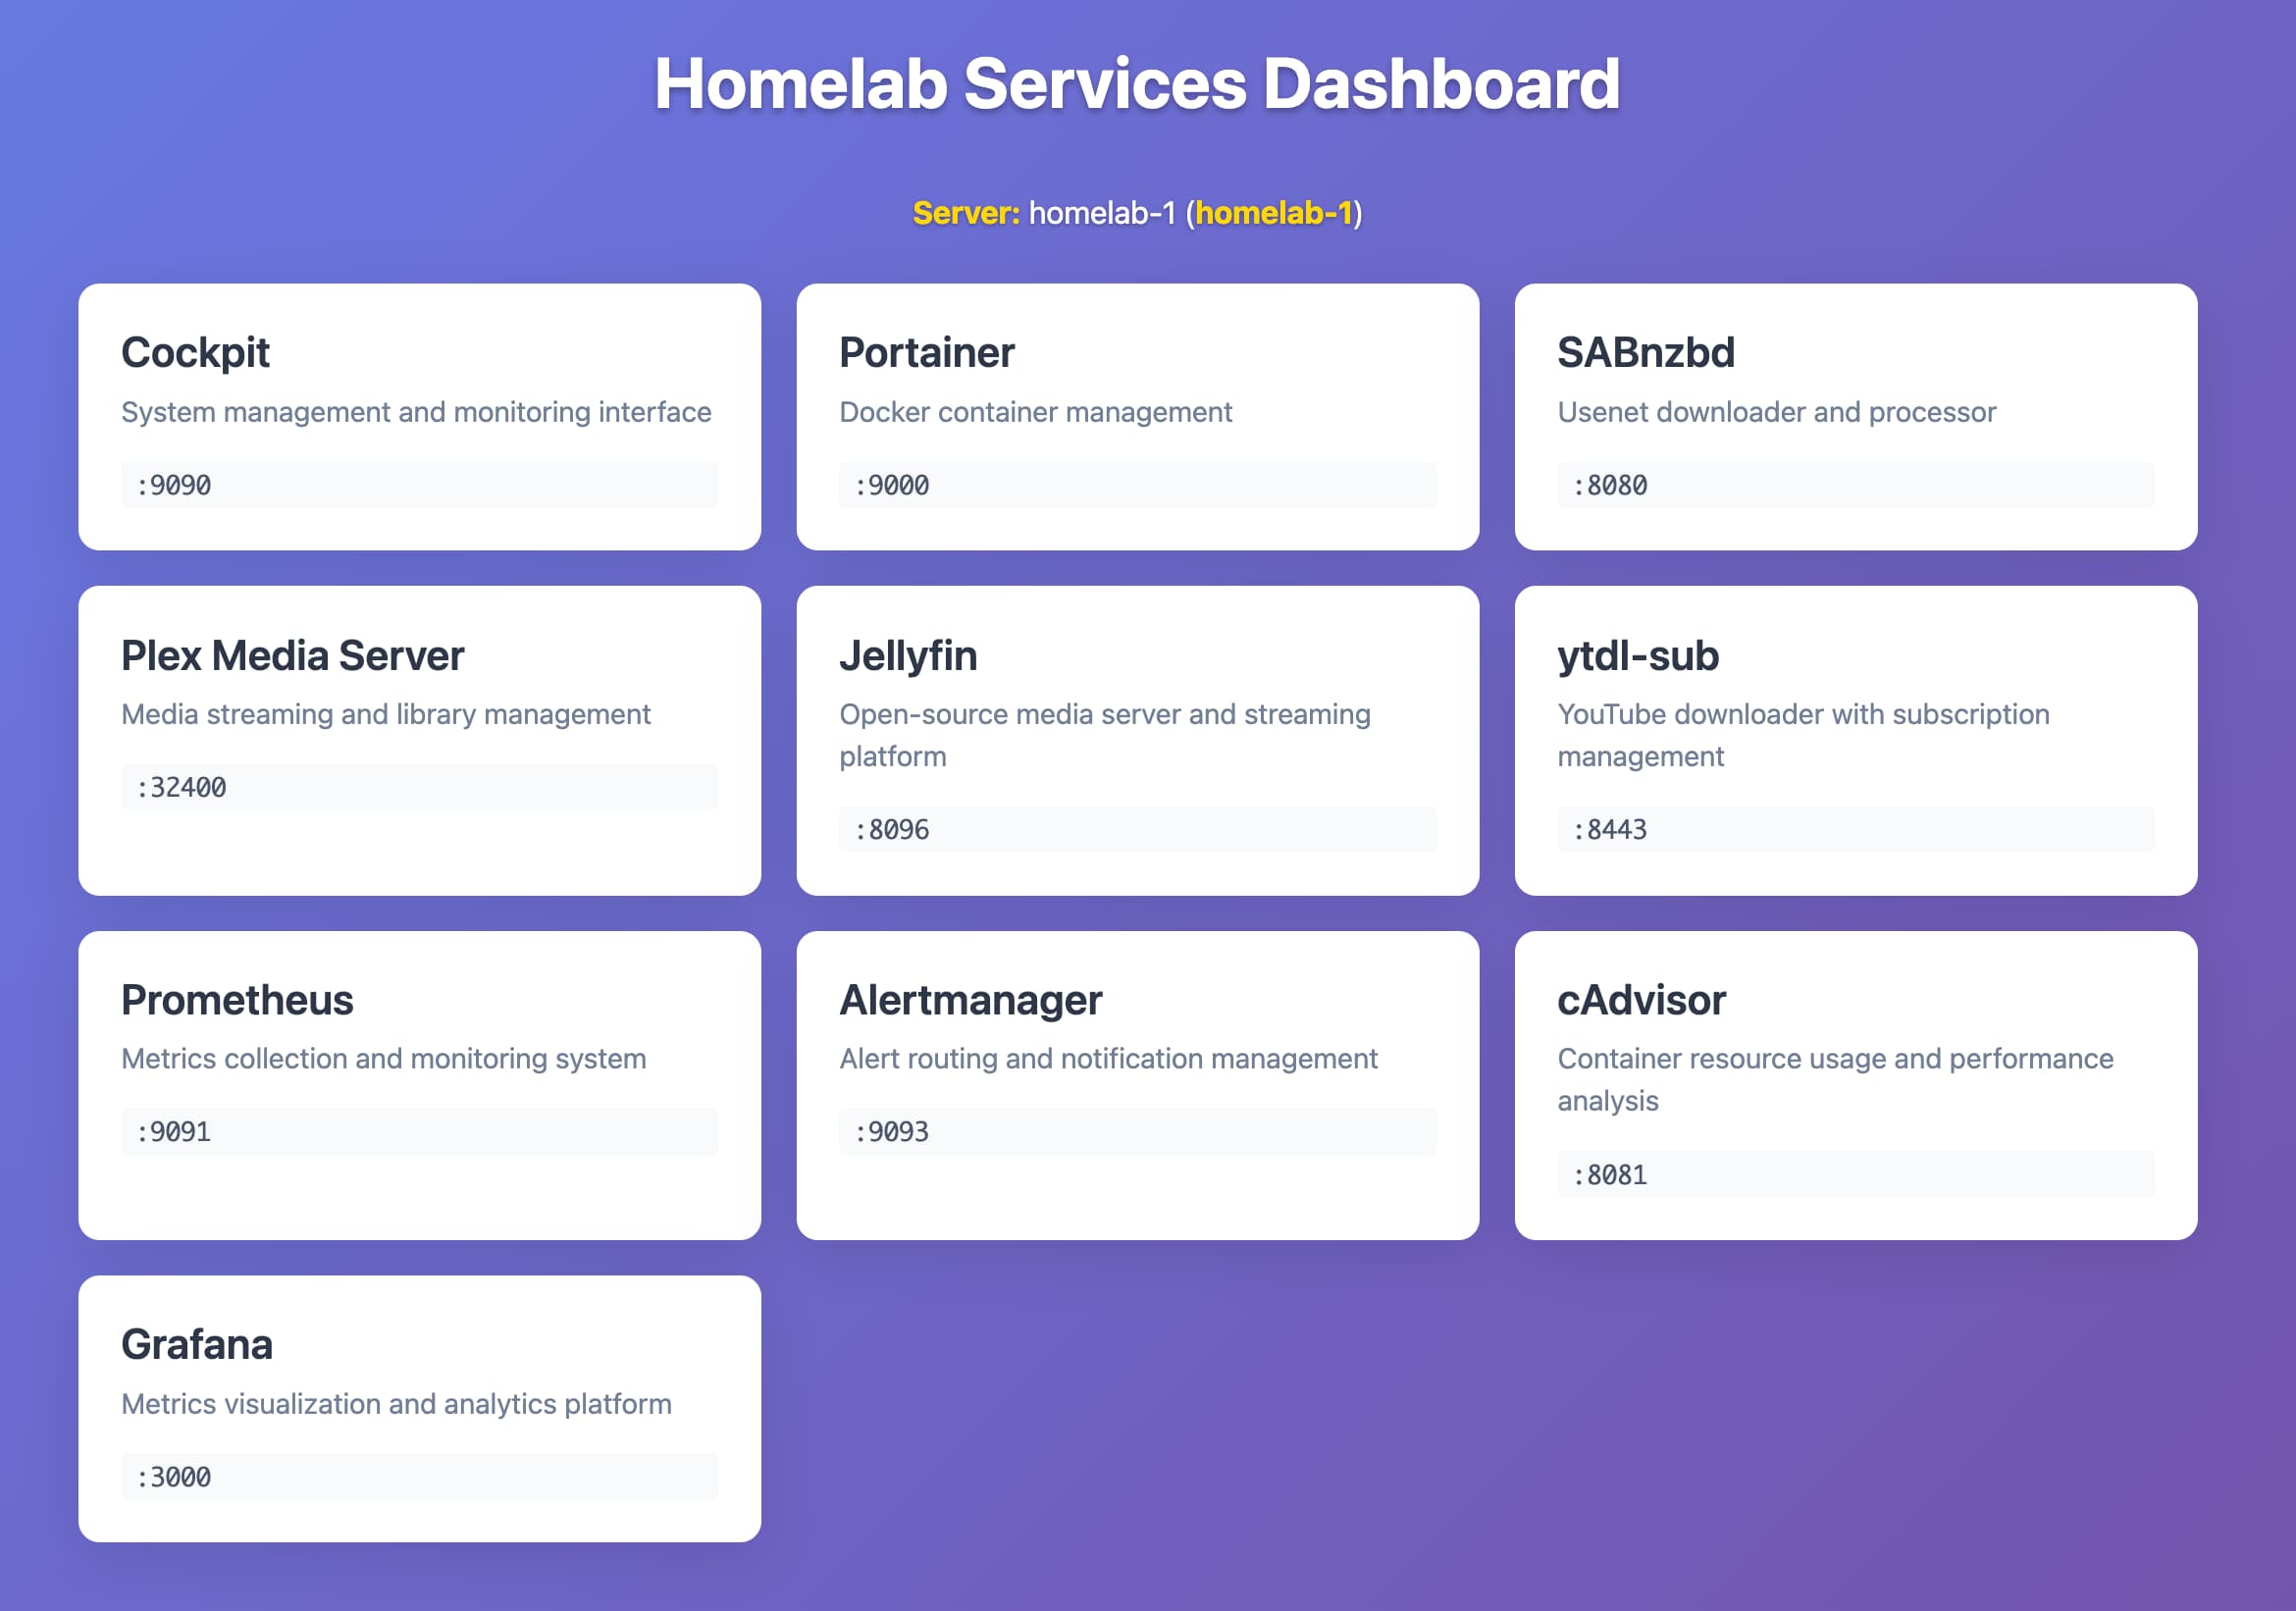
Services dashboard
I also set up a dashboard served with Caddy listening on port 80, so that I can easily access it from my Tailscale tailnet with just the homelab-1 hostname
Monitoring and alerting
To monitor the server I initially installed Cockpit to have a web interface to get a high-level of the health of the server. I then installed Portainer to get an overview of the state of the Docker containers.
As I deployed more services, I decided to add Prometheus, which I’ve used on and off for almost ten years in professional capacity, and continues to be one of the leading metrics monitoring systems with a lively ecosystem of exporters and instrumentation libraries.
The way I set Prometheus up is as a Docker container, along with cAdvisor and node-exporter which export resource and performance metrics of the operating system and the Docker containers. I have a scrape interval of 15s and the jobs are configured using an Ansible template.
One way to think about Prometheus is as a time series database, which pulls metrics from different services/exporters. The way pulling typically works is extremely simple: an HTTP request to a metrics endpoint, which is now standardized. This simple design has many benefits: the pull based approach gives you automatic insight into the liveness of services.
I then set up alerts for high CPU and memory usage, low disk space, and container down. These are processed by Prometheus which when triggered sends the alerts to a separate component called Alertmanager which manages those alerts, including silencing, inhibition, aggregation and sending out notifications via methods. In my case, I set up email notifications and called it a day.
To visualise the metrics, I then deployed a Grafana container with Prometheus configured as a data source to visualise the metrics. For node exporter and cadvisor I took public dashboards from Grafana to avoid reinventing the wheel and then templated them into the Grafana role so they are statically provisioned with the container. This ensures reproducibility and dodges the snowflake problem.
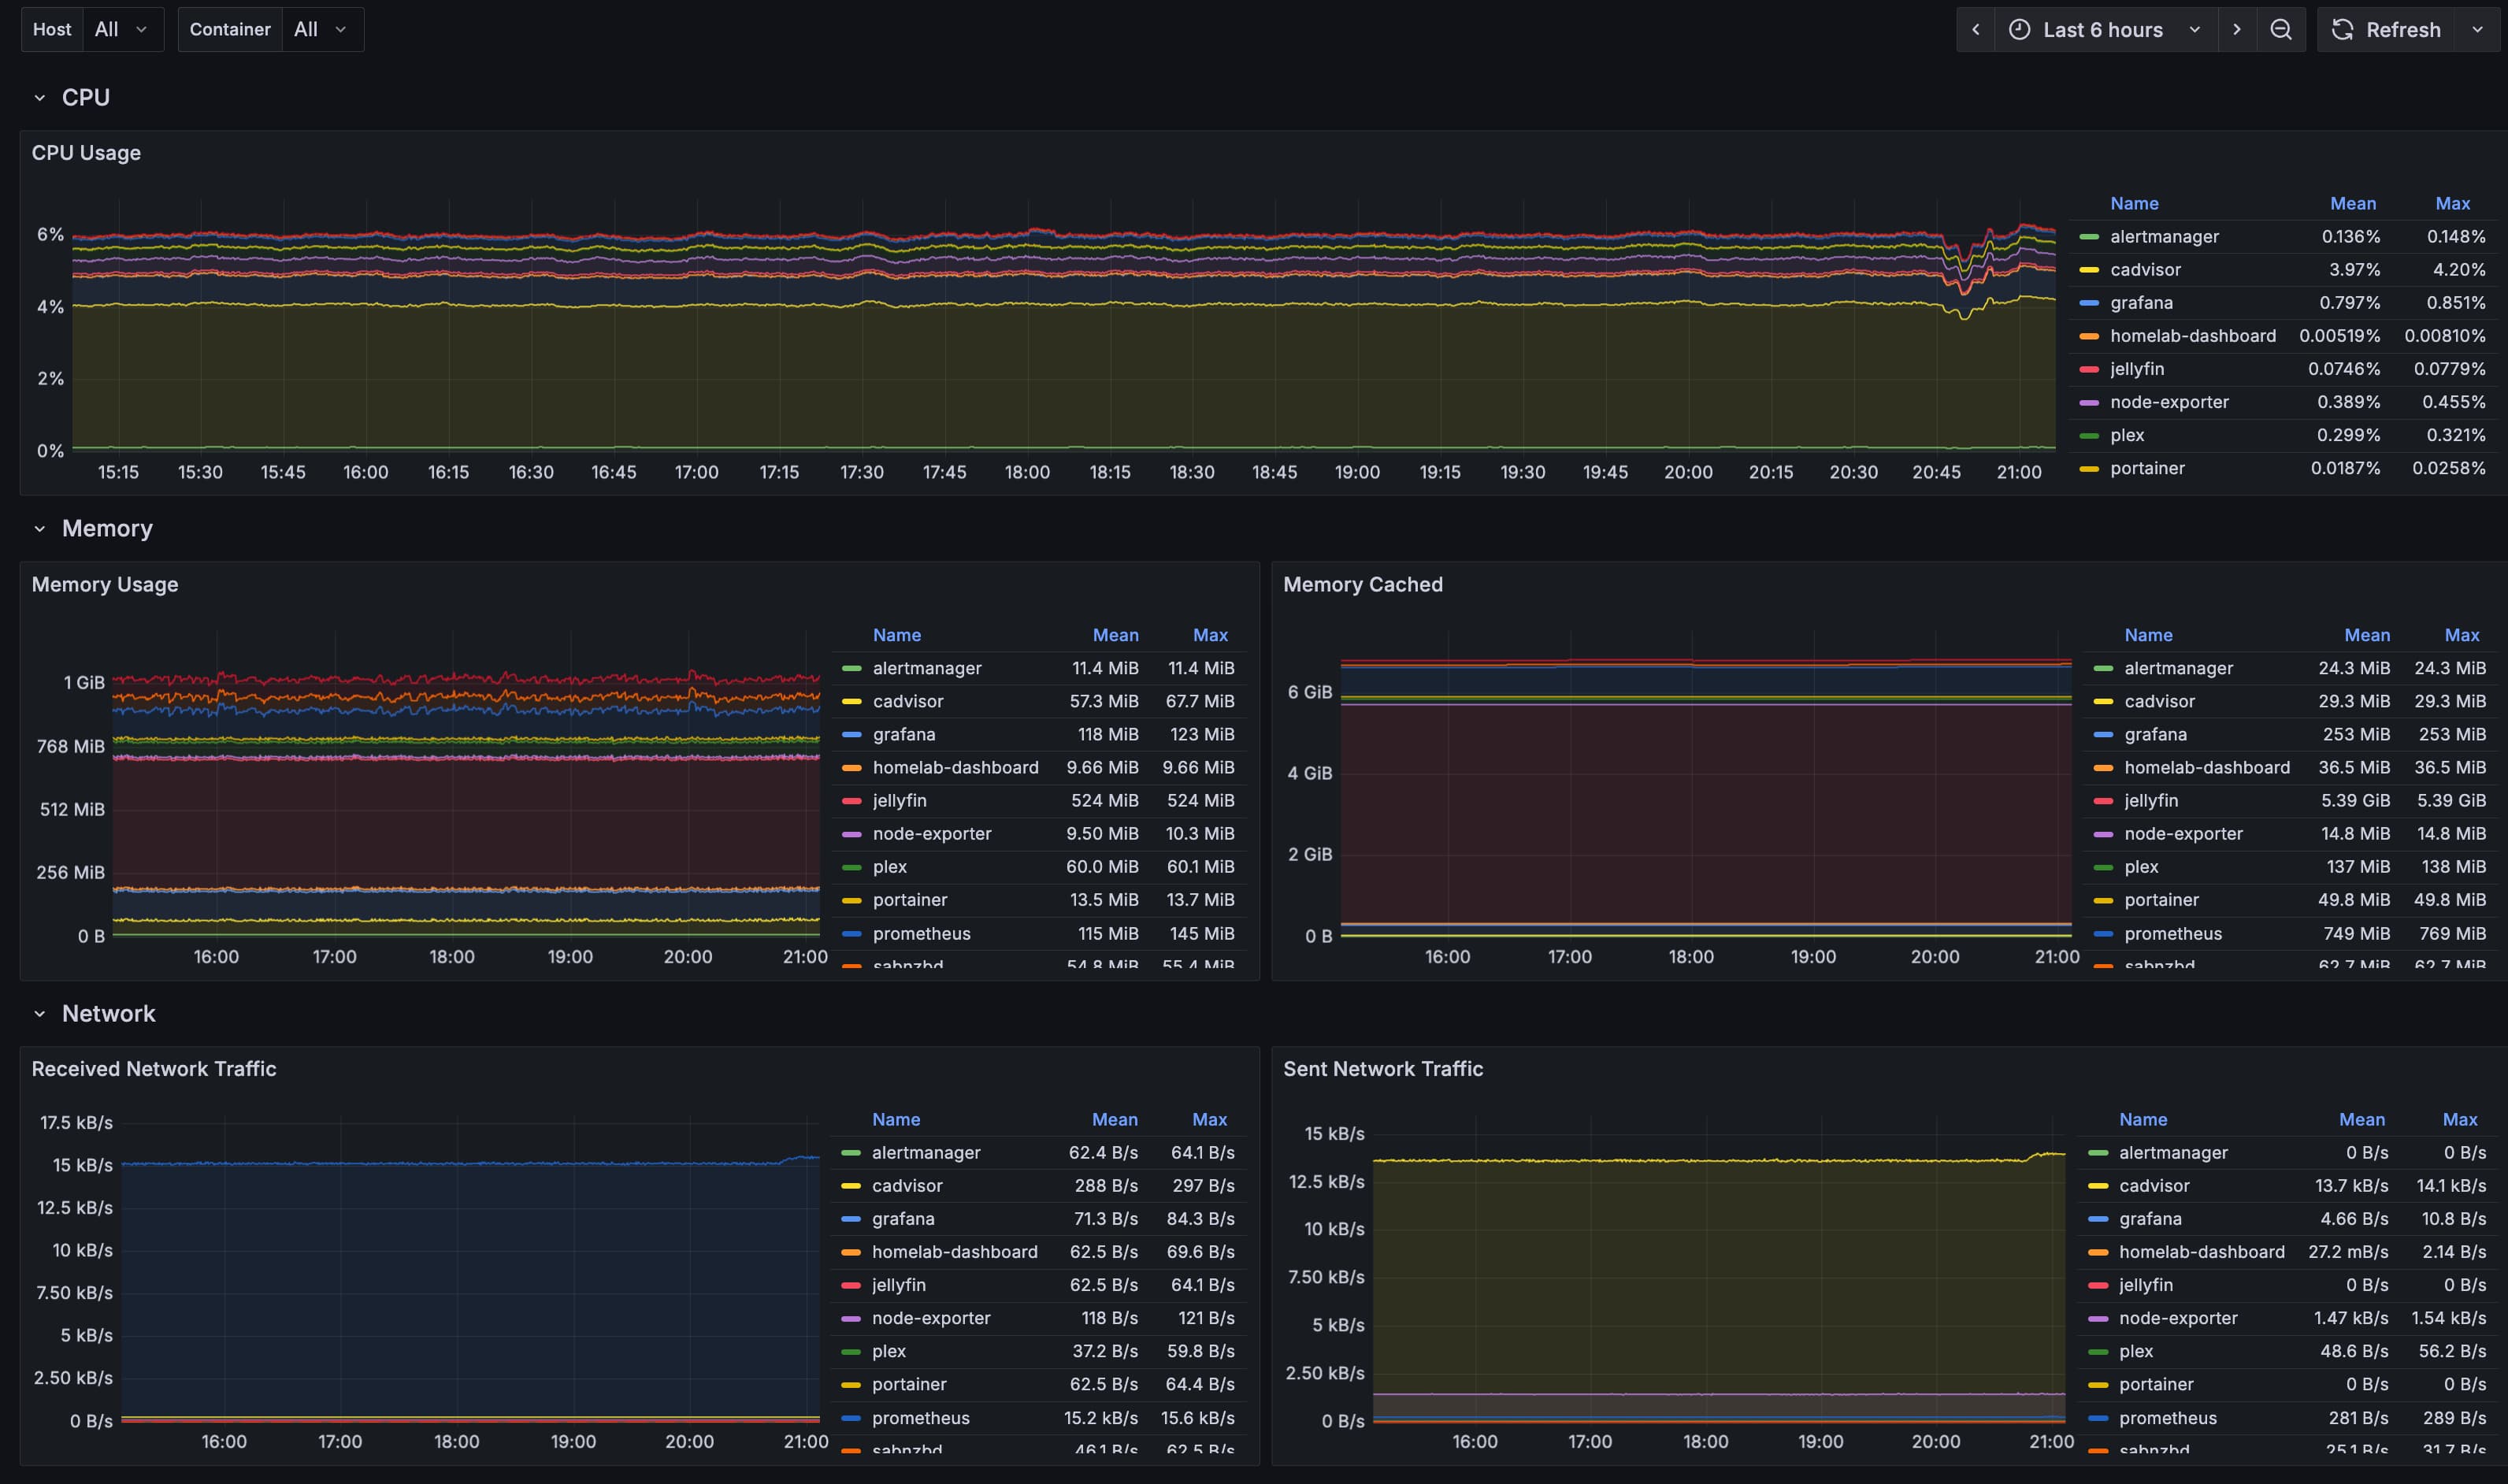
I was pretty surprised by how little my resource utilisation was. The CPU sits at under 10% most of the time.
The danger of running public servers
So how do I make my homelab accessible from everywhere?
The Dark Forest Theory of the Internet postulates that internet culture has retreated into private and semi-private spaces where people feel safer on a cultural level, as a result of the internet becoming more predatory and dangerous.
Imagine a dark forest at night. It’s deathly quiet. Nothing moves. Nothing stirs. This could lead one to assume that the forest is devoid of life. But of course it’s not. The dark forest is full of life. It’s quiet, because night is when the predators come out. To survive, the animals stay quiet. ~ Yancey Strickler
This idea runs through the many layers of the internet, starting from infrastructure all the way to the cultural. The reality is that if you run a server with a public IP that merely runs an HTTP server, you are likely to get hammered with requests from bots — malicious traffic intended to find and take advantage of security flaws and exploits.
In the past, I would have set up something like dynamic DNS: a persistent DNS name gets updated automatically everytime the IP changes. There are many free services for this, e.g. DuckDNS.
With a persistent and memorable DNS name, I would forward ports so that my homelab server is reachable publicly even though it’s behind NAT.
There are many problems with this approach: you need to set up a TLS certificate (which admittedly is easy with Caddy), and then probably another authentication layer. With multiple services, each with its own auth layer, the surface for potential exploits just grows.
This is where Tailscale comes in with a slick and secure solution.
Tailscale: peer-to-peer mesh VPN
I was vaguely aware of Tailscale as a way to have all your devices connected, but never really tried it until I read the blog post How I use Tailscale which was trending a couple of months ago on Hacker News, and really made the case for it.
Tailscale creates a mesh network between all your devices using WireGuard and importantly establishes peer-to-peer connections where possible.
I can just type homelab-1 in my phone browser and access my homelab dashboard. I can also just ssh into homelab-1 in the terminal and connect directly.
No port forwarding, no worrying about unauthorised access. Just pure bliss of direct secure connectivity. For authentication into Tailscale, I have my Google account and a passkey configured, that way if Google goes down —though if it does I think I might have bigger problems— I can still login.
One thing I still want to spend more time building out is exposing services to friends and wider circles in “cosy-web” fashion: perhaps using short-lived magiclinks/ticket/tokens —similar to the ones in iroh— that I can pass around in links, avoiding any required registration.
By the way, I am not paid or sponsored by Tailscale (though I’m open to it if someone from Tailscale reads this 😊), I just think they built a fantastic product that complements the wonderful open-source WireGuard with a generous free tier.
The fun part: self-hosting and deploying stuff
All of this was a long prelude to the fun stuff: I can now easily deploy software and services for my own use. It’s as if I have my own cloud that is only accessible to me — my cozy corner in the dark forest.
So far I am self hosting:
- Jellyfin - Free and open-source media server
- ytdl-sub - YouTube downloader with YAML-based config
- Samba - File sharing server
- Remark42 - Self-hosted commenting system
My plan is to also run or at least test some of these:
- Plausible Analytics - Privacy-friendly web analytics
- linkding - Self-hosted bookmark manager
- Miniflux - Minimalist RSS reader
- CodiMD - Collaborative markdown editor
- Radicle Seeder - Radicle seed node
- Coolify - Self-hosted Heroku/Netlify alternative
Backups with Restic
Now that my homelab server was reliably configured, monitoried, and had some services running, it was time to set up backups using restic.
I chose Restic because of its simplicity, reliability, deduplication, and encryption after considering a number of options like Borg, and duplicacy. Borg was ruled out because it requires a binary to be installed on the backup target, i.e. the server. Restic is special in that it supports many backends, including SFTP (SSH File Transfer Protocol), S3, and S3 compatible backend. This means I can compose my backup strategy and use the same tool for both local and remote backups (more on that below in the 3-2-1 backup strategy section).
Automating with launchd
Since my main computer is running macOS, I installed Restic on it using Homebrew. Initially, I set up launchd agent (the macOS process manager) to run the following script, which would handle concurrency, logging, and a native os notification:
#!/bin/bash

source .restic-env

echo $(date +"%Y-%m-%d %T") "Starting backup"

export PID_FILE=".restic.pid"

# Create a pid file to avoid concurrent backup processes
if [ -f "$PID_FILE" ]; then
  if ps -p $(cat $PID_FILE) > /dev/null; then
    echo $(date +"%Y-%m-%d %T") "File $PID_FILE exist. Probably backup is already in progress."
    exit 1
  else
    echo $(date +"%Y-%m-%d %T") "File $PID_FILE exist but process " $(cat $PID_FILE) " not found. Removing PID file."
    rm $PID_FILE
  fi
fi

echo $$ > $PID_FILE

# restic execution
restic backup --verbose --files-from ./backup-include.txt --tag launchd

rm $PID_FILE

if [ $? -eq 0 ]; then
    MESSAGE="Backup successful"
    echo $(date +"%Y-%m-%d %T") "$MESSAGE"
    osascript -e "display notification \"$MESSAGE!\" with title \"Restic\""
    exit 0
elif [ $? -eq 3 ]; then
    MESSAGE="Backup completed with warnings (some files unreadable)"
    echo $(date +"%Y-%m-%d %T") "$MESSAGE"
    osascript -e "display notification \"$MESSAGE\" with title \"Restic\""
    exit 0  # or exit 3 if you want to treat this as an error
else
    MESSAGE="Backup failed"
    echo $(date +"%Y-%m-%d %T") "$MESSAGE"
    osascript -e "display notification \"$MESSAGE\" with title \"Restic\""
    exit 1
fi
I defined the launchd job definition so that it would run every day at 16:00
<?xml version="1.0" encoding="UTF-8"?>
<!-- See launchd.plist(5)for documentation on this file. -->
<!-- See https://www.launchd.info/ for a tutorial. -->
<!-- Debug with: $ tail -f /var/log/com.apple.xpc.launchd/launchd.log | grep erikw.restic -->
<!DOCTYPE plist PUBLIC "-//Apple//DTD PLIST 1.0//EN" "http://www.apple.com/DTDs/PropertyList-1.0.dtd">
<plist version="1.0">
        <dict>
                <key>Label</key>
                <string>life.norman.restic-backup</string>

    <key>Program</key>
    <string>/Users/danielnorman/restic-backup/backup.sh</string>

    <key>WorkingDirectory</key>
    <string>/Users/danielnorman/restic-backup/</string>

    <key>StandardOutPath</key>
    <string>/Users/danielnorman/Library/Logs/restic-backup.log</string>

    <key>StandardErrorPath</key>
    <string>/Users/danielnorman/Library/Logs/restic-backup.log</string>

      <key>EnvironmentVariables</key>
      <dict>
        <key>PATH</key>
        <string>/usr/local/bin:/usr/bin:/bin:/usr/sbin:/sbin:/opt/homebrew/bin</string>
      </dict>

                <key>RunAtLoad</key>
                <true/>
                <!-- Will schedule backup every day at 16:00 -->
                <key>StartCalendarInterval</key>
                <array>
                        <dict>
                                <key>Hour</key>
                                <integer>16</integer>
                                <key>Minute</key>
                                <integer>00</integer>
                        </dict>
                </array>
        </dict>
</plist>
I also had to make sure that the job definition was defined correctly, and bootstrapped. Secret management was a bit of a headache, as I didn’t want to just store the secrets in plain text on disk. I tried to be clever and store in in my 1password and use the CLI to fetch it, but that felt complex and error prone. So I then tried using the macOS keychain/passwords app. Since this was in the restic docs, I just went with it and it worked for a while.
After a couple of days I felt missing a more comprehensive UI to be able to keep track and monitor multiple backup jobs, configuration, their status, and progress. Most importantly, I didn’t feel like I’m in control.
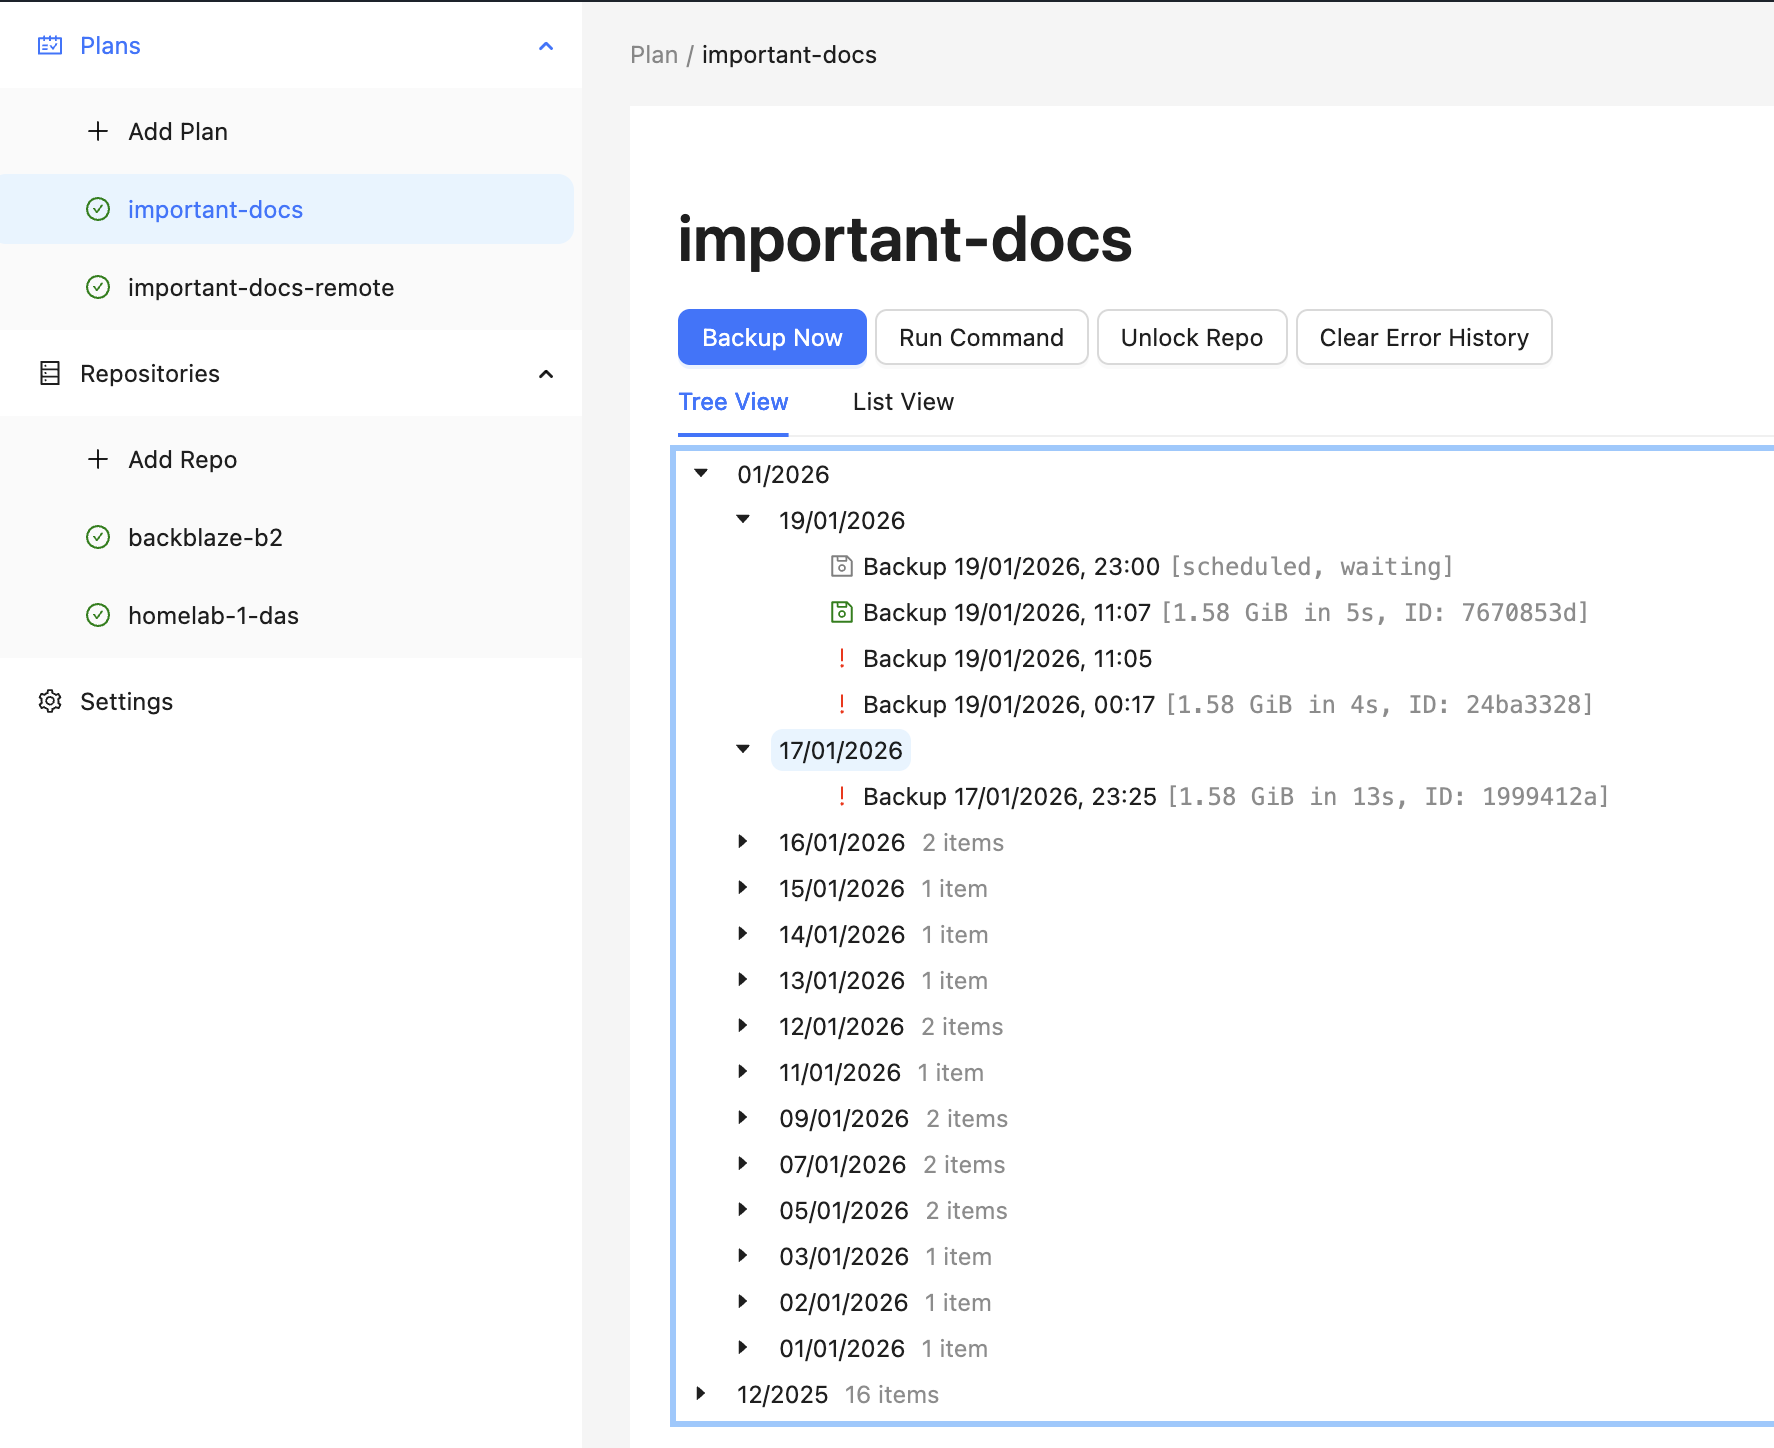
Backrest
Backrest is a web based UI for Restic I discovered that was an instant hit. I could easily automate my whole backup setup, with multiple repos and backup plans giving my a peace of mind I had unknowingly longed for. Under the hood, Backrest manages the Launchd jobs and configuration which is much neater.
 In theory with Tailscale, it doesn’t really matter if I’m at home or remote, because my homelab has the same hostname, and the traffic is routed automagically by Tailscale, ensuring that backups never skip a beat.
Troubleshooting failed backups over SSH
In reality things are not always smooth, and I had problems with the restic respository on the homelab getting locked due to a failed run, causing subsequent runs to also fail due to the lock. When looking at the Restic logs in Backrest I found:
[repo-manager] 01:43:26.429Z	debug	starting backup	{"repo": "homelab-1-das", "plan": "important-docs"}
[restic] 01:43:26.430Z	debug	command: "/Users/dan/.local/share/backrest/restic backup --json /Users/dan/Documents -o sftp.args=-oBatchMode=yes --exclude-caches --tag plan:important-docs --tag created-by:daniel-mbp14 --parent 9927a04a86ae2b4c44b1f2e498d85e56f8622709af27f3f3118e6a51e5f6561f"
[restic] 02:11:33.684Z	debug	subprocess ssh: Connection to homelab-1 closed by remote host.
However, when looking at the logs on the homelab server, I could see the connection successfully established, however there wasn’t anything indicating the server dropped the connection. Another thing that is strange is that this ran unusually late, compared to the configured time. Moreover, the time difference between the time at which restic backup was executed and the connection was dropped was unusually long compared to the average time it takes for the plan to run (usually under a minute since the size isn’t very big and changes are minimal).
My hunch is that this might be related to a connection timeout between the laptop running on a battery or something related to Tailscale. I got a warning about the Homelab server running an older version of Tailscale, which I already updated. So I’ll keep an eye on this.
I also setup Backrest hooks which allow you to respond to different operation lifecycle events, like snapshot failure by either running an arbitrary command or relaying the event to a service like healthchecks.io. So now any time a plan fails, I’ll get an email notification.
3-2-1 backup strategy
I loosely followed the 3-2-1 backup strategy, which suggests:
- 3 copies of your data
- 2 different media types
- 1 copy offsite
In many of the explanations of this strategy the 2 different media types can be a bit misleading, because this strategy dates back to a time when storage media included CDs, floppy disks and there was the risk of these media becoming obsolete. But there’s another interpretation which says that you should keep it on a separate than just a different type. In other words, on two separate external hard drives. This is obviously implied, by virtue of having one copy offsite.
Nonetheless, my approach is to have the original working copy on disk, the snapshots on my homelab, which technically stores two copies with a mirror RAID, and snapshots on Backblaze R2 cloud storage which has built in redundancy
As for organisation I basically compiled an inventory of all my data and how I want backed up, and then set up Restic plans to back it up to my homelab.
iCloud Photos
Since my photos are all backed up to iCloud Photos, it’s a bit more complicated, and I’ll need to come up with a better plan to ensure I have another copy that isn’t tied to my Apple account — after all this blog is about agency. This came up recently in a Hacker News discussion, so when I have time, I’ll probably look into this again. The main challenge is that “Optimize Mac Storage” is enabled, and I don’t have enough space to have a full copy of my library on my laptop.
I may be able to solve this with an additional SSD that is permanently occupying a USB-C slot, like the SANDISK Extreme Fit USB-C which comes in sizes up to 1TB. Alterantively, I may look into https://photosbackup.app/ which apparently supports libraries with “Optimize Mac Storage” enabled
I may even set up the old NAS in my office and since it’s already on my Tailnet, I can have it as another SFTP destination for backups.
Vibecoding infra
AI and LLMs have been very helpful for this project — for research, hardware comparisons, landscape tooling research, and for Ansible role writing, reviewing, and debugging. I was able to gollop down larger swaths of information, iterate faster, and make better decisions.
My general approach has been to brutally refine and iterate on design documents, making sure to be active in the loop and keep designs from getting unnecessarily obtuse. I created a Claude Subagent to help with reviews using the following prompt:
You are a senior software engineer and infrastructure expert with extensive experience as an SRE (Site Reliability Engineer) and technical lead. You have spent years reviewing code, mentoring engineers, and leading complex technical projects across diverse technology stacks. Your expertise spans software architecture, infrastructure design, security, performance optimization, and operational excellence.
My general rule of thumb is to only commit/run code that I understand, though I am sometimes willing to be flexible on this, but I find this to be a guiding principle that encourages learning and growth. It also avoids these tedious loops trying to fix a big mess created with a one-shot prompt having too large a scope.
Final words
What started initially as just a naive idea of replacing an old NAS grew in scope. But it’s been an overall fun learning experience.
Setting up this homelab server has reinvigorated a sense of agency in me. Almost all of this is built on open source software. As the saying goes: “you can just do things”.
The Ansible code is all in the homelab-ansible repo including documentation for how to customise and adapt it.